In this screen, you can define SLA rules for tracking availability of your websites and servers.
To get started, click the New Availability SLA link under SLA->New SLA section.
Follow the steps explained below to configure a new availability SLA:
SLA Name: Provide a name that uniquely identifies the SLA. This is a mandatory field.
Description: You can provide a brief description explaining the SLA in this field.
Business Hours: If you have defined any business hours previously, you can specify it here. The availability SLA will then be applicable for the timeframe defined within the Business Hour.
For example, assume you have defined a business hour named 'Friday' as between 08:00 to 20:00 hours. This timeframe is applicable every Friday. Now if you specify this business hour while creating new availability SLA, it means the SLA will be applicable from 08:00 to 20:00 hours on Fridays.
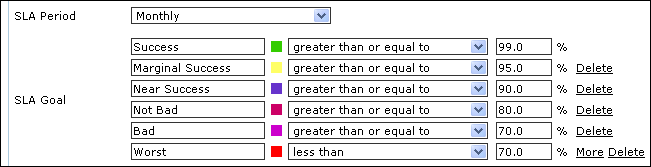
SLA Period: Specify the time period for the SLA. You can select either monthly, quarterly or yearly SLA.
SLA Goal: To meet the SLA, availability can be set as equal to, greater than, greater than equal to, less than or less than or equal to a percentage value. By default, it is 99.0 %.
You can add multiple SLA goals if required by clicking the 'more' link adjacent to the 'SLA Goal' field. You may use color coding to differentiate between multiple SLA goals or targets. Click the colored icon next to the first text field in the SLA Goal section. This will open the color picker tool with which you can select appropriate color for the goal.
Associate SLA to Monitors: In this step, you associate the monitors in your account to the SLA. You can select the monitors from the available list.
Click Update button to create a new Availabilty SLA.

 Uploading ....